Integrating vROps with vRO using webhook shim
Introduction
In an ideal world, running custom vRO workflows as a result of a triggered alert in vROps would be either an out of the box feature or (easily) possible via a vROps management pack.
There have been two incarnations of a vRO management pack for vROps and neither has provided this, the first incarnation did, with a lot of manual changes to the vROps adapter file allow this, and from an initial inspection of the latest vRO management pack this would also be possible – perhaps the subject of another blog post!
So, in the absence of such a (perfect) solution the good news is that there is a solution to the challenge, and there have already been a number of blog posts written on this subject, both from VMware staff and externally. Whilst working with a customer I found that none of these resources captured all of the steps in a single succinct post, that didn’t assume any previous knowledge.
The solution
A couple of years back, John Dias and Steve Flanders wrote a web hook shim that enabled vROps and vRLI to interact not just with vRO but with a number of different endpoints. The web hook shim is a small python application that listens for requests from vROps or vRLI and translates those requests into something that the intended endpoint can understand.
Install Photon OS
As VMware has their own Linux distribution, this is what I have used for this blog post, especially as it works really well as a container host. There are lots of articles on how to get an instance of Photon OS up and running quickly:
https://vmware.github.io/photon/
The easiest method is to use the OVA image. Although you should note that there has been an issue with the hardware version 13 image, as outlined on William Lam’s blog:
Configure Network Settings
Whilst you could leave the VM to use DHCP for network addressing, you’ll most likely want to configure a static IP address. Details on how to do this can be found in the photon OS administration guide:
I ended up with a network configuration file as shown below:

Once the networking configuration has been set, run the following command to restart the network daemon:
systemctl restart systemd-networkd
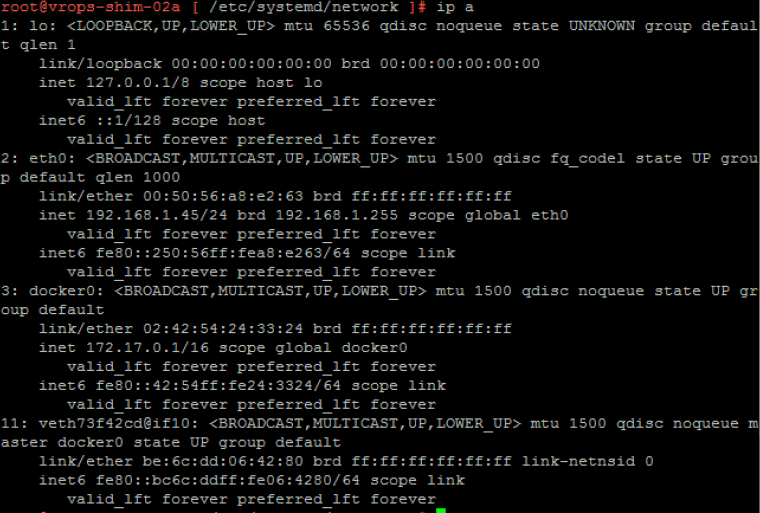
Run the following command to validate that the IP address information has been set correctly
ip a
The result should be something similar to that shown below
Configure Hostname
To set the hostname of the appliance run the following command:
hostnamectl set-hostname abc
To check that is has been set correctly run the following command:
hostnamectl
The result should be something similar to that shown below:

Configure Docker
We will be running the web hook shim as a Docker container. Docker is already installed within the Photon OS image, but it is does not configured to run by default. Docker also needs to be configured to start automatically
Start Docker
Start Docker by running the following command:
systemctl start docker
Set Docker to start automatically
Set Docker to start automatically during system start by running the following command:
systemctl enable docker
Start the web hook shim
The web hook shim is available on Docker Hub, so as long as the appliance can access the internet then getting it running is a simple process. Before we can get the link between vROps and vRO working we need to do some configuration of the web hook shim. Run the following command to start the Docker container
docker run -it -p 5001:5001 --name {yourchoice} vmware/webhook-shims bash
This command runs the container interactively, sets the ports that the container will respond on, gives it a memorable name, pulls the container image from Docker hub and provides a bash shell to allow shell access within the container
To check the status of the the container run the following command:
docker ps -a
This will have an output similar to the following:

Configure the web hook shim
Attach to the container by running the following command:
docker attach vmwareshim
The various translation files for the different endpoints are in a directory called ‘loginsightwebhookdemo’:
cd loginsightwebhookdemo
vi vrealizeowchestrator.py
The first element to change is the hostname of the vRO endpoint to which alert notifications will be sent:
VROHOSTNAME = 'vrohostname'
If running an instance of vRO from a vRA appliance there is no need to include port information. If running the standalone version of vRO then you will need to include port 8281 in this section for example:
VROHOSTNAME = 'myvroserver.mydomain.local:8281'
Information around the various means of authentication can be found within the vrealizeowchestrator.py file. Amend the various components as necessary to achieve the desired authentication mechanism:
USENETRC = True
VROUSER = ''
VROPASS = ''
VROTOKEN = ''
VROHOK = ''
If running in an environment without trusted certificates, the following line needs to be set so that certificate checks are disabled:
VERIFY = False
The shim currently has an issue whereby two instances of the workflow are executed for each alert that is triggered. To fix this issue edit the vrealizeorchestrator.py file and alter the following line:
@app.route("/endpoint/vro/", methods=['PUT', 'POST'])
To:
@app.route("/endpoint/vro/", methods=['POST'])
Save the file and then exit vi.
Using .netrc credentials
Prior to configuring the web hook shim, if .netrc credentials are going to be used it is easier to configure these now, instead of having to exit the shim, creating the credentials and then re-attaching
To use netrc credentials, run the following commands:
cd ~
echo 'machine {vro-host-or-ip} login {vro-login-name} password {vro-password}' > .netrc
chmod 600 .netrc
Start the web hook shim
Once all of the configuration has been done it is time to start the web hook shim:
cd ..
./runserver.py
A couple of information messages will be displayed. To validate that the web hook shim is operating, open a web browser and enter the address as:
webhooksshimiporhostname:5001
You should see the following returned

Useful commands
To stop the web hook shim enter the following command:
CTRL-C
You can restart the web hook shim later via this command:
./runserver.py
To detach from the Docker container, whilst leaving the web hook shim running, use the following command:
CTRL-P, CTRL-Q
Setup the master workflow in vRO
Before vROps can be configured we need a workflow that will receive the alerts generated. In John Dias’s series of posts he discusses a vRO workflow package that can be imported and used to test the functionality. That package can be found at the following location:
https://github.com/vmw-loginsight/webhook-shims/tree/master/samples
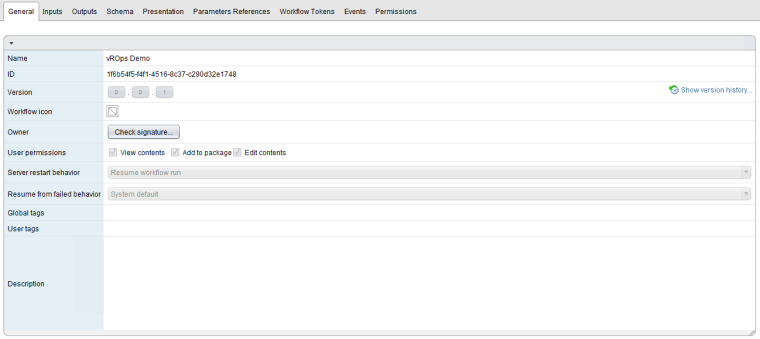
When configuring vROps we are going to specify the ID of a workflow that will be run. This workflow needs to have a single input called ‘alertId’ with a type of ‘string’. For the purposes of this blog post I’m going to keep things really simple and merely prove the ability to run a workflow based on a vROps alert. As a result my workflow is really basic, it has a single input and just outputs that alert to the system log.
The ID of the workflow can be found on its general tab, under ID. Copy this and save it for later.
vROps configuration
At a high level the configuration steps within vROps consist of the following:
- Setup an outbound instance
- Configure notification settings
- Setup a test alert
Setup an outbound instance
The first step is to create the outbound instance using the OOTB Rest Notification Plugin. You get to the notification settings via the following sequence:
Administration > Management > Notification Settings
Configure the outbound plugin with the following parameters:
| Parameter | Value |
| Plugin Type | Rest Notification Plugin |
| Instance Name | vmwareshim |
| Endpoint | http://webhookshimip:5001/endpoint/vro/workflowId |
| Username | none |
| Password | none (but you must put something in this box) |
| Content Type | application/json |
| Certificate Thumbprint | none |
| Connection Timeout | 20 |
To validate the settings, press the test button. The test will fail within vROps with the following error displayed:

However, you will be able to see that integration is working by looking within the photon OS appliance. If you have an SSH session open and you’re attached to the web hook shim container then you should see the following log output:

You can also check within vRO, where there should be a an execution of the workflow specified

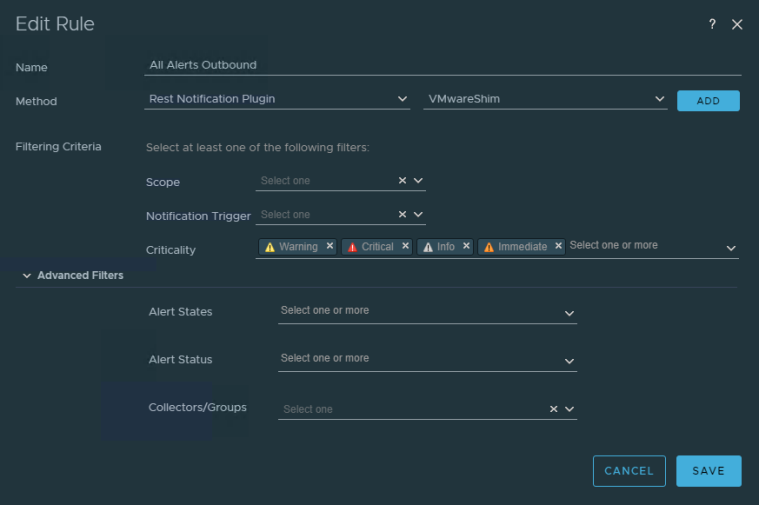
Configure notification settings
vROps can be configured to send notifications to multiple targets and use advanced filtering to determine where different alerts should be sent. For the purposes of this blog post I am going to configure a notification rule to send all alerts to vRO via the web hook shim. Configure the rule by navigating to the following page:
Alerts > Alert Settings > Notification Settings
The rule should look like the following image:
Setup a test alert
The final step is to have an alert triggered. If you’re performing this in an environment with active ESXi hosts / Virtual Machines, then the likelihood is that you will get alerts triggered anyway. If you are just testing this in a lab, configure an alert with symptoms that have such low thresholds that they will inevitably get triggered.

Once the alert has been triggered you should be able to see successful executions of your workflow in vRO. In my case I’m just logging the alertId but that is all that you need to be able to extract a lot of information – although there will be multiple REST calls required to vROps in order to get that information.
John Dias included some initial steps that could be used to retrieve information about the affected object. The basic flow is as follows:
- alertID – retrieving the alert from vROps will also return the alertDefinitionId and the resourceId of the affected object
- resourceId – can be used to retrieve the name of the object, properties of the object, related object, triggered symptoms
- alertDefinitionId – can be used to find out more prescriptive information about the alert definition itself and can be used to match the symptoms of the alert definition to the triggered symptoms on the resource
Additional Resources
There are a large number of blog posts around this subject, which may provide additional information and/or context:
https://blogs.vmware.com/management/2017/03/webhook-shims-now-available-on-docker-hub.html
https://blogs.vmware.com/management/2017/02/self-healing-datacenter.html
